> ## Documentation Index
> Fetch the complete documentation index at: https://docs.axoma.ai/llms.txt
> Use this file to discover all available pages before exploring further.
# Microsoft
## Tool Integration Setup Guide for MS Outlook, Sharepoint & Teams
The Microsoft Outlook connector enables Axoma to securely access emails, calendars, and mailbox data using OAuth 2.0 through Microsoft Entra. Users must create and configure an app in the Entra portal to generate OAuth credentials and assign the necessary Microsoft Graph permissions. Once authenticated, Axoma can read and process emails, manage calendar events, and automate communication workflows, ensuring secure, consent-based access to Outlook data.
To enable MS Teams functionality inside AXOMA, users must first register an application in Microsoft Entra Admin Centre and configure permissions.
### 🔹 Step 1 : Create/Register an App in Microsoft Entra
In this step, you register a new application in the Microsoft Entra portal to generate essential OAuth credentials such as the Client ID, Tenant ID, and Client Secret. This app acts as a secure identity for Axoma to request authorized access to Microsoft services like Teams, Outlook, or OneDrive.
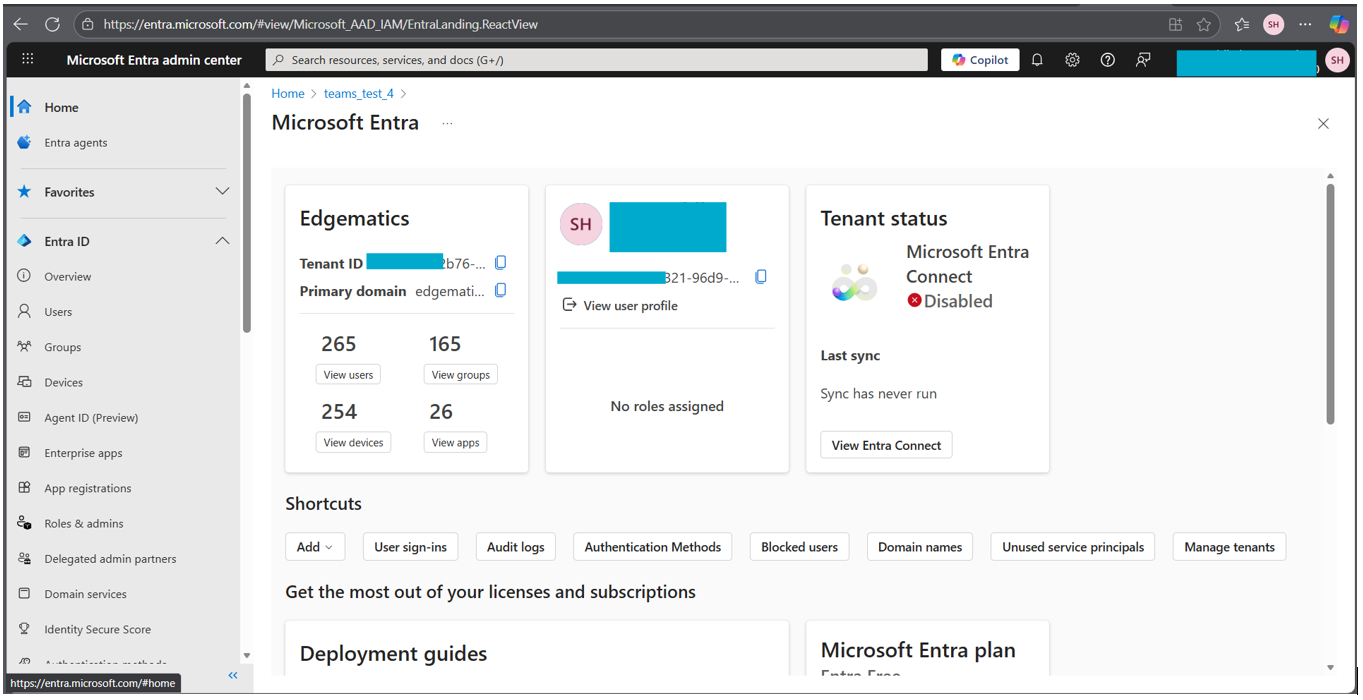 1. Go to: [https://entra.microsoft.com](https://entra.microsoft.com)
2. From the left panel, navigate to App registrations
1. Go to: [https://entra.microsoft.com](https://entra.microsoft.com)
2. From the left panel, navigate to App registrations
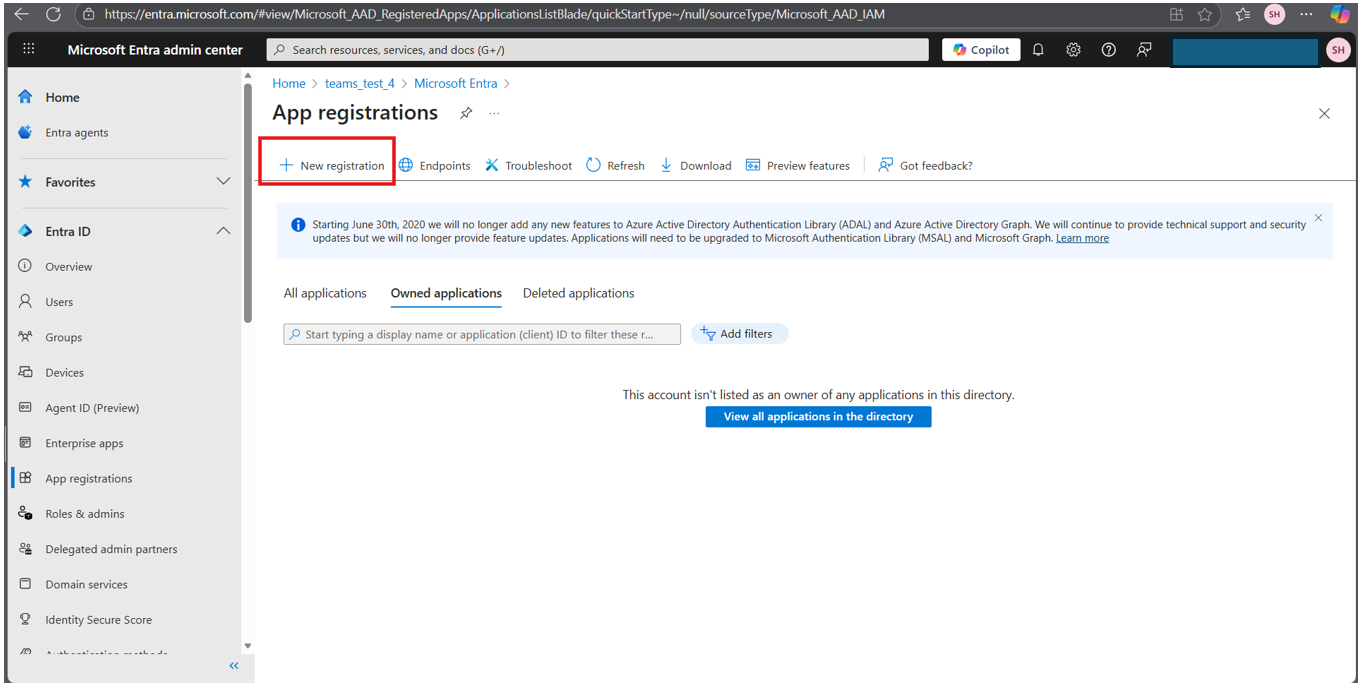 3. Click on New registration
4. Enter the Application Name (example: Axoma Teams Integration)
3. Click on New registration
4. Enter the Application Name (example: Axoma Teams Integration)
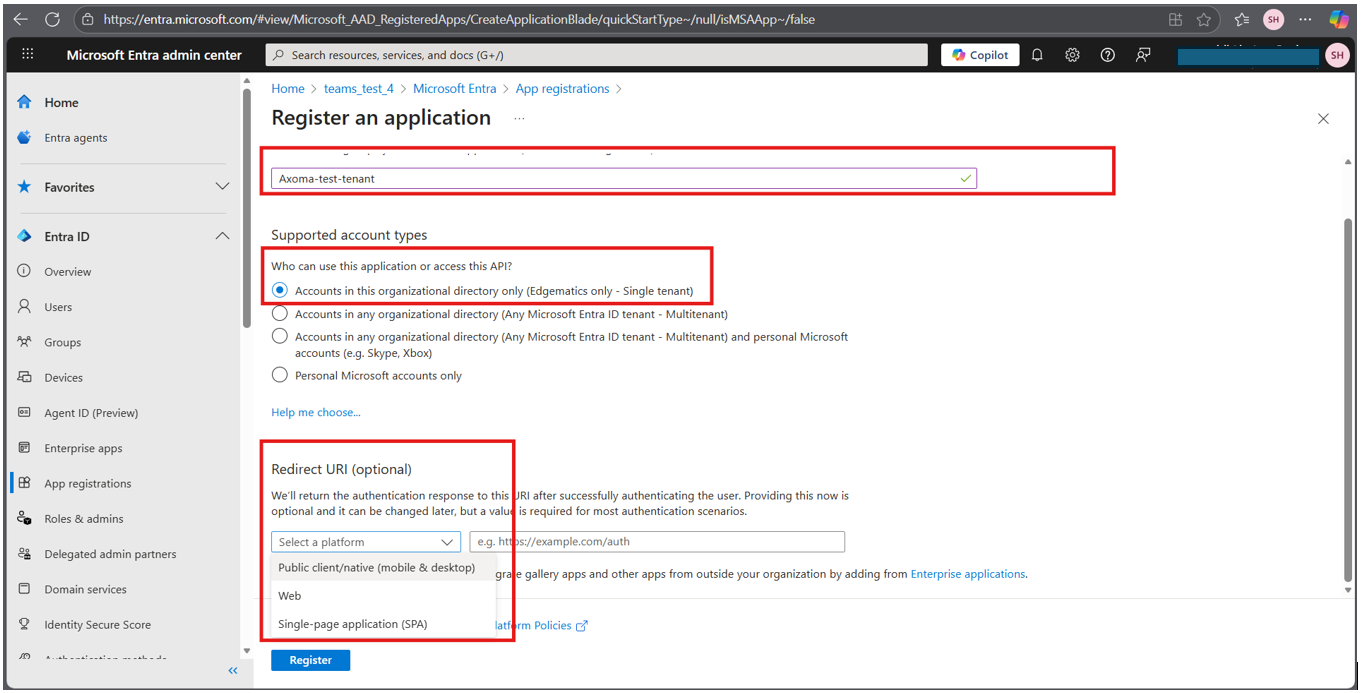 5. Under Supported account types, select: Public client native (mobile & Desktop)
6. In the Redirect URI (optional) section: Place the callback URL available in AXOMA > agent studio > agent creation STEP 2
5. Under Supported account types, select: Public client native (mobile & Desktop)
6. In the Redirect URI (optional) section: Place the callback URL available in AXOMA > agent studio > agent creation STEP 2
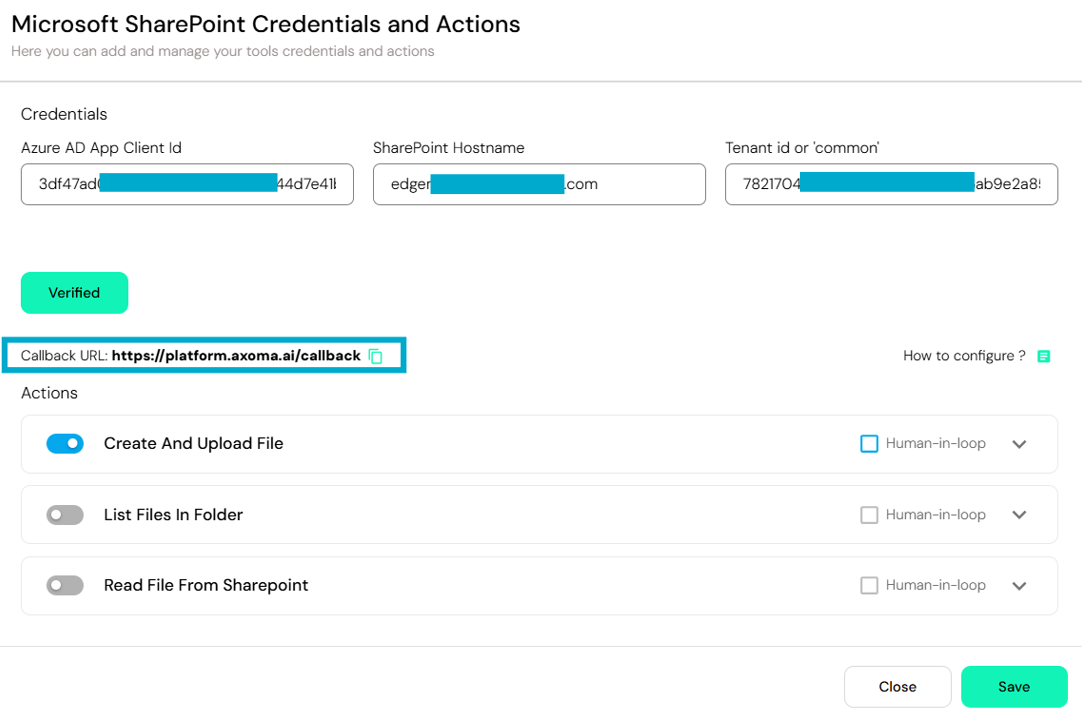 7. Paste Axoma’s Callback URL ([https://platform.axoma.ai/callback](https://platform.axoma.ai/callback)) (Found in Axoma ➜ Agent Studio ➜ Step 2 Tool Configuration popup)
8. Click Register
### 🔹Step 2: Collect Required Credentials
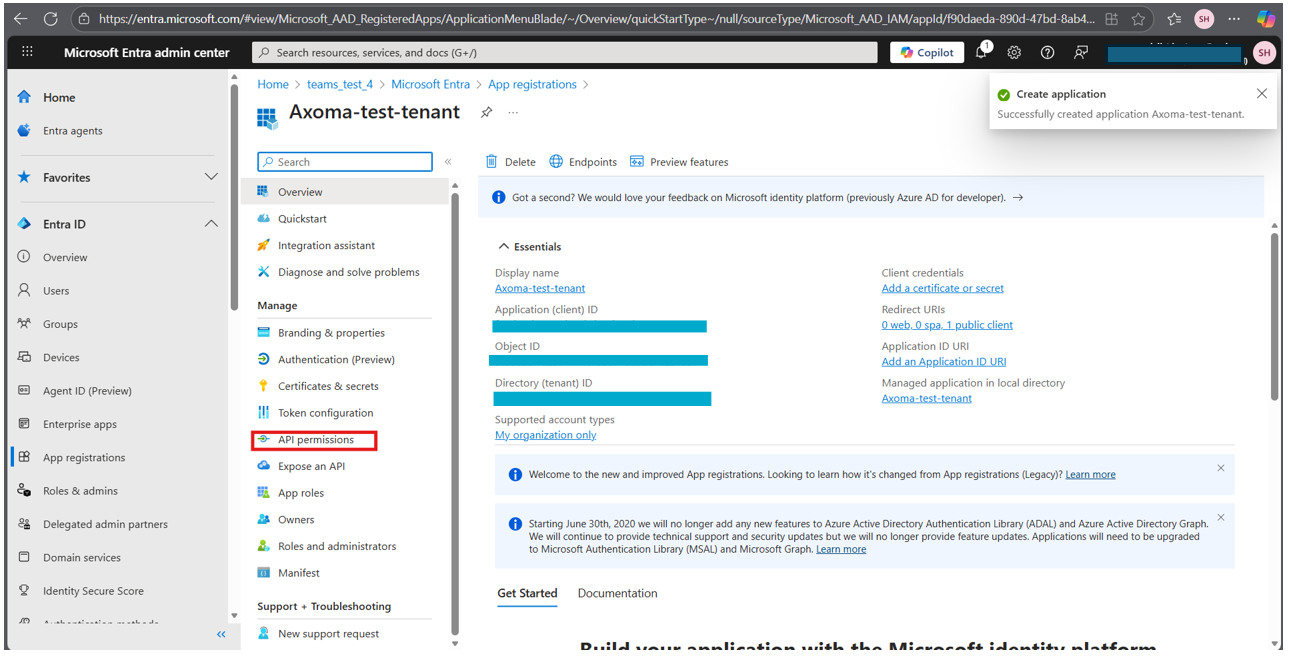
After successful registration, go to the API permissions tab.
7. Paste Axoma’s Callback URL ([https://platform.axoma.ai/callback](https://platform.axoma.ai/callback)) (Found in Axoma ➜ Agent Studio ➜ Step 2 Tool Configuration popup)
8. Click Register
### 🔹Step 2: Collect Required Credentials
After successful registration, go to the API permissions tab.
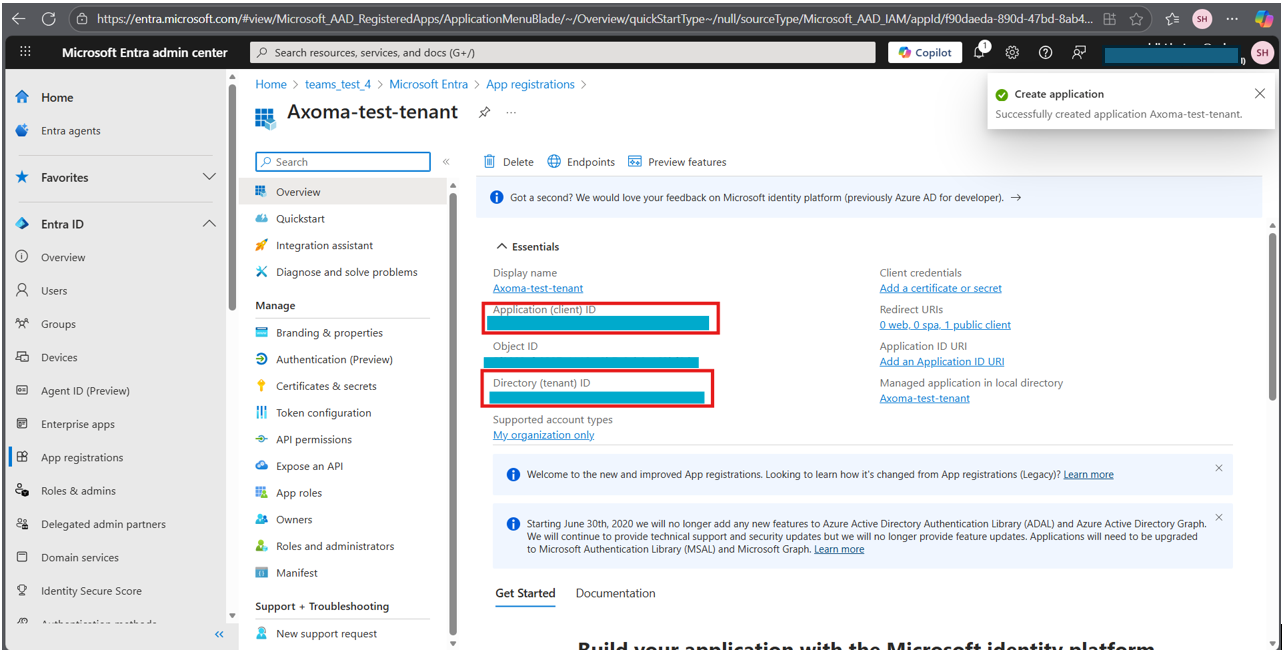
 These two IDs must be entered later in Axoma ➜ Agent Studio ➜ Step 2 Tool Configuration.
 ### 🔹Step 3: Add Microsoft Graph Permissions
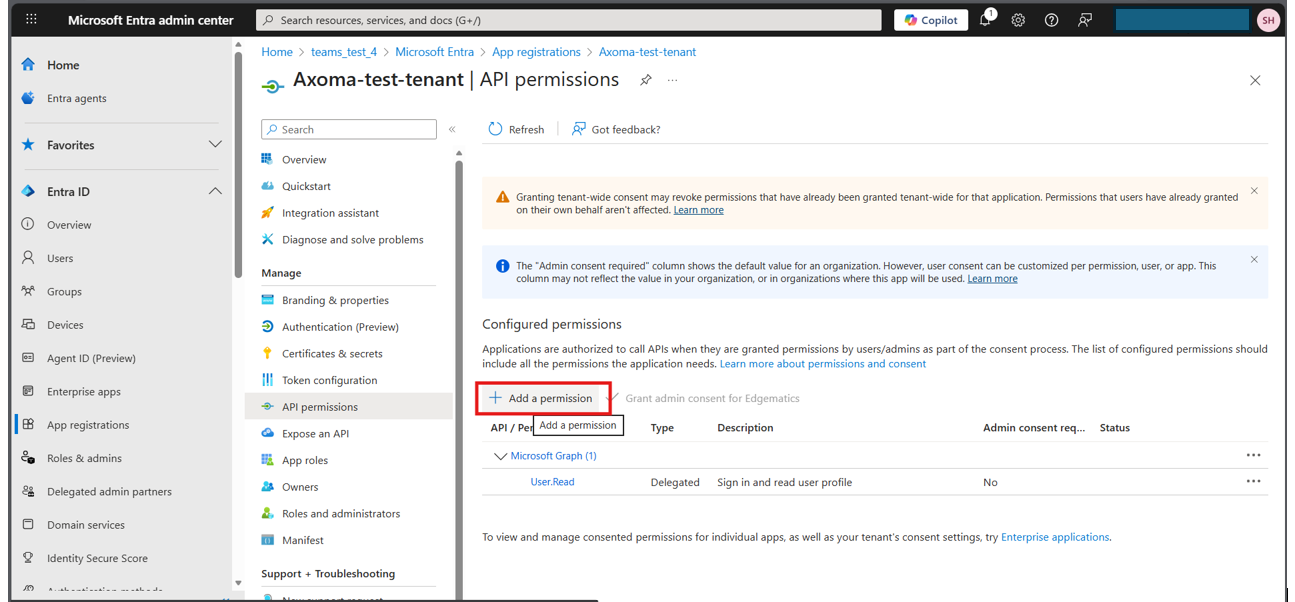
1. Go to API Permissions
2. Click + Add a permission
### 🔹Step 3: Add Microsoft Graph Permissions
1. Go to API Permissions
2. Click + Add a permission
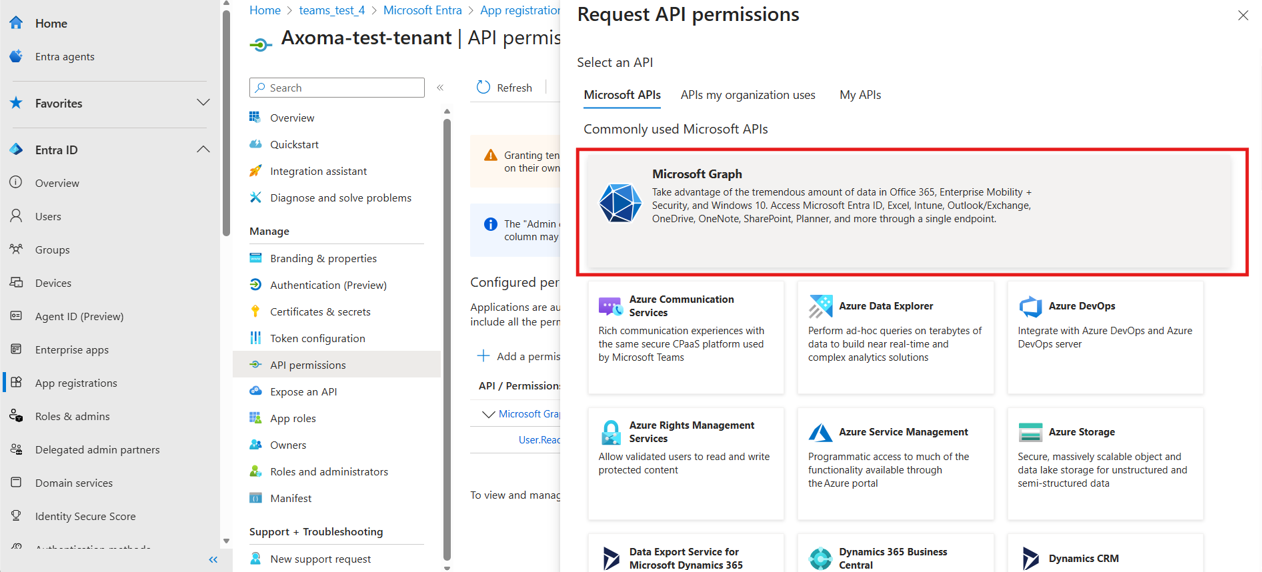
 3. Select Microsoft Graph
 4. Choose Delegated permissions
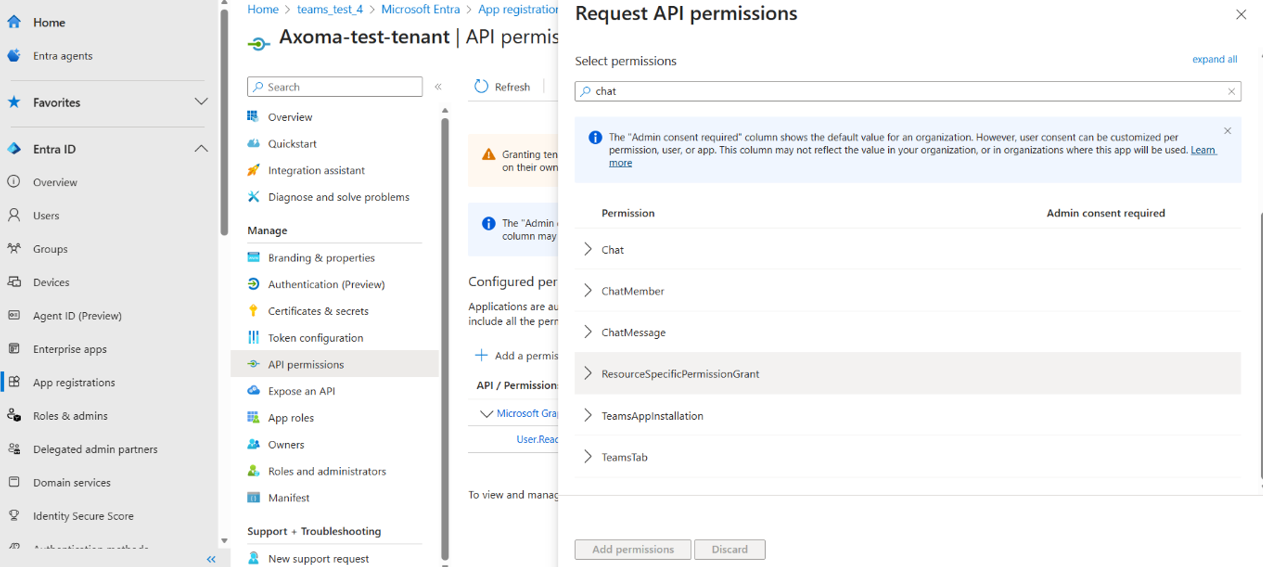
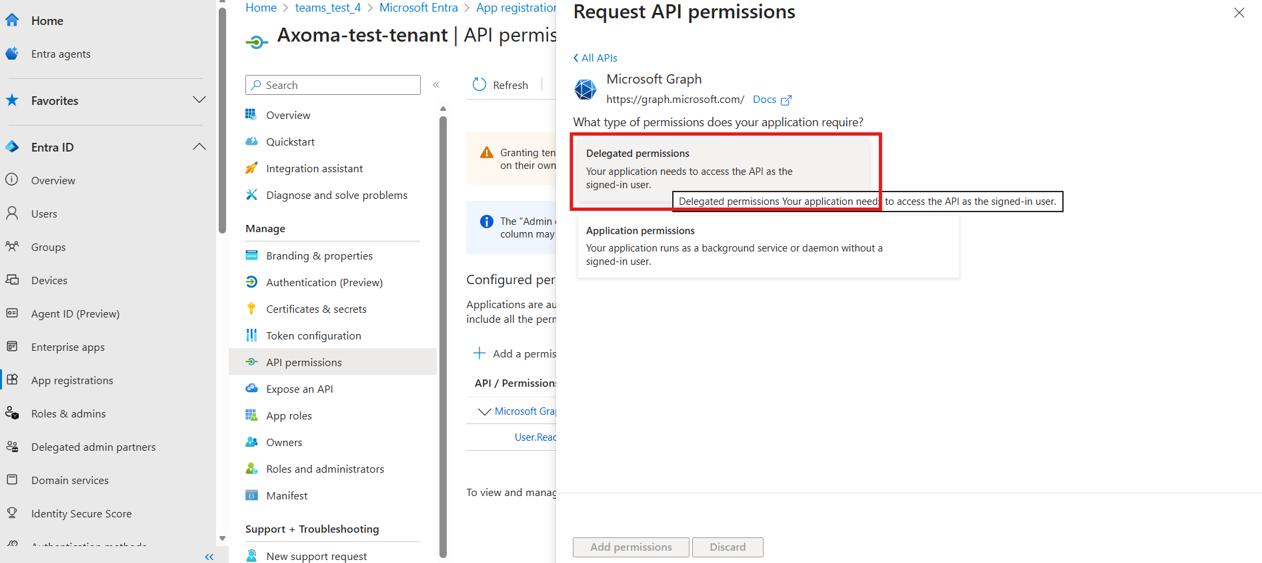 5. Add the required deligated permissions from below:
* "Mail.Read"
* "Mail.Read.Shared"
* "Mail.ReadBasic"
* "Mail.ReadBasic.Shared"
* "Mail.ReadWrite"
* "Mail.ReadWrite.Shared"
* "Mail.Send"
* "openid"
* "profile"
* "User.Read"
* "offline\_access"
* "Sites.ReadWrite.All",
* "Sites.Manage.All",
* "openid",
* "profile",
* "User.Read",
* "offline\_access"
* "Team.ReadBasic.All",
* "Channel.ReadBasic.All",
* "ChannelMessage.Send",
* "Chat.Read",
* "Chat.ReadWrite",
* "openid",
* "profile",
* "User.Read",
* "offline\_access"
5. Add the required deligated permissions from below:
* "Mail.Read"
* "Mail.Read.Shared"
* "Mail.ReadBasic"
* "Mail.ReadBasic.Shared"
* "Mail.ReadWrite"
* "Mail.ReadWrite.Shared"
* "Mail.Send"
* "openid"
* "profile"
* "User.Read"
* "offline\_access"
* "Sites.ReadWrite.All",
* "Sites.Manage.All",
* "openid",
* "profile",
* "User.Read",
* "offline\_access"
* "Team.ReadBasic.All",
* "Channel.ReadBasic.All",
* "ChannelMessage.Send",
* "Chat.Read",
* "Chat.ReadWrite",
* "openid",
* "profile",
* "User.Read",
* "offline\_access"
 ⚠ Important: Some Graph permissions require Admin Consent.
If you do not have permission to grant them, contact the IT/Cloud Admin / Azure Admin team to approve the permissions.
### 🔹Step 4 Configure in Axoma Agent Studio
1. Navigate to Step 2 ➜ Tool Configuration
2. Select MS Teams/Outlook/Sharepoint (according to usecase)
3. Enter:
• Application (Client) ID
• Tenant ID
4. Proceed to Step 3 and enable the required toggles/features
5. Go to Step 4 ➜ Try & Publish
6. Provide a valid Functional API Key (optional)
7. Test with example prompts
Example Prompts to Test in Axoma Playground
| **Use Case** | **Example Prompt** |
| ------------------------ | -------------------------------------------------------------------------------------------------- |
| **Fetch last messages** | Fetch the last 5 messages from *Michael* |
| **Notify a group** | Send a message to the group *UI Team* informing that I will be on leave tomorrow. |
| **Group summary** | Analyze the last 10 messages on the group *UI Team* and give me a summary. |
| **Check mention** | Analyze the last 10 messages on *UI Team* and tell me whether anyone has mentioned *Michael* |
| **Extract action items** | Analyze the last 10 messages on *UI Team* and list pending tasks/action items for each team member |
Outcome
Once the setup is completed:
* Users can send & receive Teams messages directly from Axoma
* No need to open Microsoft Teams separately
* Enables seamless collaboration inside the Axoma platform
Note: Example prompts may vary depending on the use case and can be tested in the Agent Studio Playground, as well as in the Workflow and Personal Assistant chat screens, with the appropriate configurations enabled.
⚠ Important: Some Graph permissions require Admin Consent.
If you do not have permission to grant them, contact the IT/Cloud Admin / Azure Admin team to approve the permissions.
### 🔹Step 4 Configure in Axoma Agent Studio
1. Navigate to Step 2 ➜ Tool Configuration
2. Select MS Teams/Outlook/Sharepoint (according to usecase)
3. Enter:
• Application (Client) ID
• Tenant ID
4. Proceed to Step 3 and enable the required toggles/features
5. Go to Step 4 ➜ Try & Publish
6. Provide a valid Functional API Key (optional)
7. Test with example prompts
Example Prompts to Test in Axoma Playground
| **Use Case** | **Example Prompt** |
| ------------------------ | -------------------------------------------------------------------------------------------------- |
| **Fetch last messages** | Fetch the last 5 messages from *Michael* |
| **Notify a group** | Send a message to the group *UI Team* informing that I will be on leave tomorrow. |
| **Group summary** | Analyze the last 10 messages on the group *UI Team* and give me a summary. |
| **Check mention** | Analyze the last 10 messages on *UI Team* and tell me whether anyone has mentioned *Michael* |
| **Extract action items** | Analyze the last 10 messages on *UI Team* and list pending tasks/action items for each team member |
Outcome
Once the setup is completed:
* Users can send & receive Teams messages directly from Axoma
* No need to open Microsoft Teams separately
* Enables seamless collaboration inside the Axoma platform
Note: Example prompts may vary depending on the use case and can be tested in the Agent Studio Playground, as well as in the Workflow and Personal Assistant chat screens, with the appropriate configurations enabled.