> ## Documentation Index
> Fetch the complete documentation index at: https://docs.axoma.ai/llms.txt
> Use this file to discover all available pages before exploring further.
# Tenant Management
The Tenant Management area in Axoma is designed for organizing and isolating workspaces or environments where
specific groups of users can collaborate, manage data, and access features independently. This functionality is essential
for organizations that operate with multiple business units, departments, or clients. Access to this section is restricted
to Super Admins under the Global Settings panel, ensuring secure and centralized management of tenants.
Access Control: This module is accessible only to [Super Admin](http://localhost:3000/introduction/introduction#super-admin) users.
Global Settings → Tenant Management → Click Create New Tenant → Assign Active Users → Edit Tenant Name
(optional) → Toggle Enable/Disable as needed
## Create a New Tenant
 Super Admins can create a new tenant to set up a separate working environment within the platform.
#### Steps to Create a Tenant
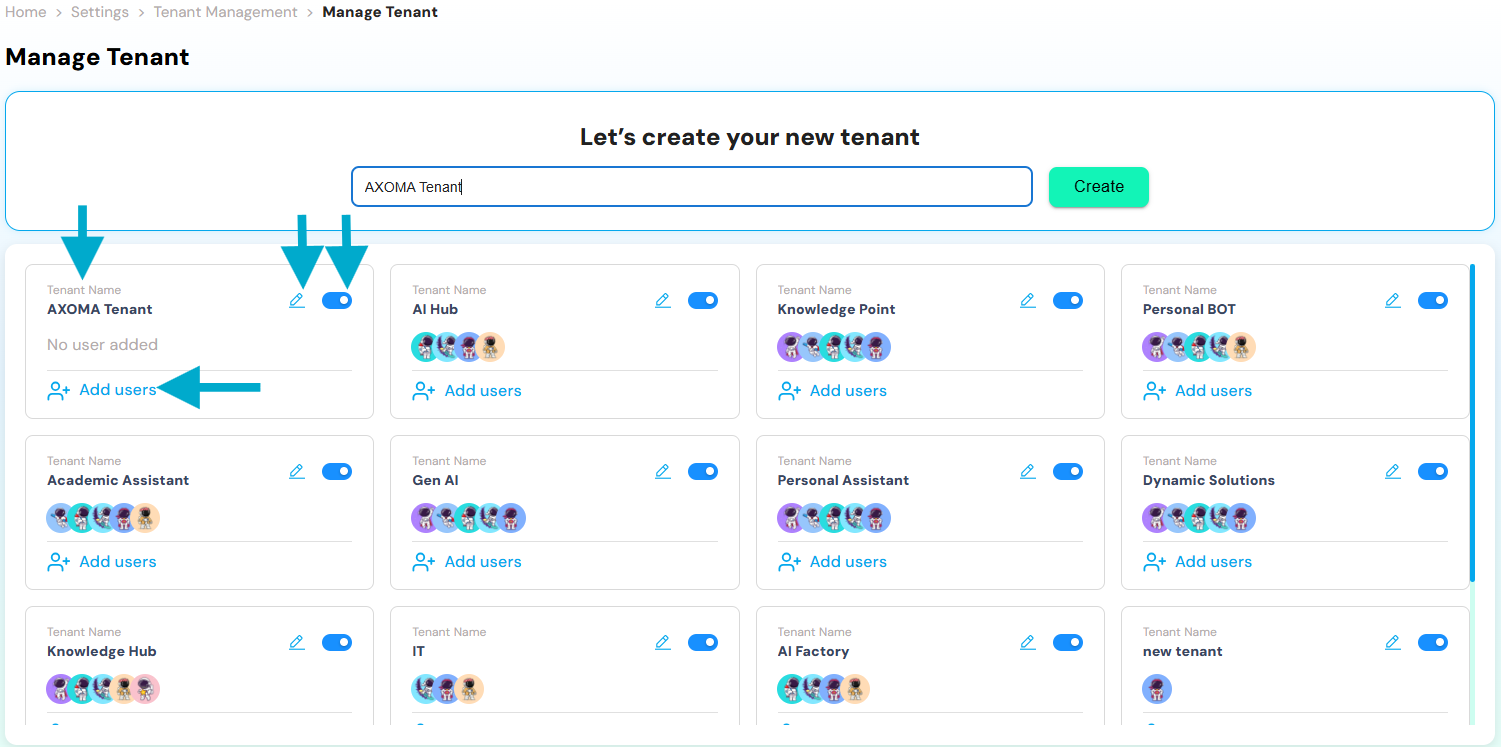
* At the top of the screen, under "Let’s create your new tenant", enter a valid tenant name in the input field.
* The name should follow proper string formatting, avoiding special characters and unnecessary white spaces.
* Click the “Create” button to register the new tenant.
Once created, the tenant appears as a card in the tenant list, ready for further configuration.
## Edit Tenant
Each tenant card contains a pencil icon that allows Super Admins to rename an existing tenant.
Super Admins can create a new tenant to set up a separate working environment within the platform.
#### Steps to Create a Tenant
* At the top of the screen, under "Let’s create your new tenant", enter a valid tenant name in the input field.
* The name should follow proper string formatting, avoiding special characters and unnecessary white spaces.
* Click the “Create” button to register the new tenant.
Once created, the tenant appears as a card in the tenant list, ready for further configuration.
## Edit Tenant
Each tenant card contains a pencil icon that allows Super Admins to rename an existing tenant.
 #### Steps to Edit
* Click on the pencil icon beside the tenant name.
* Modify the name as needed, adhering to naming conventions.
* Changes are reflected immediately across the platform where the tenant is referenced.
Editing the tenant name is useful for renaming teams, aligning with rebranding, or
correcting naming errors without deleting and recreating the tenant.
## Add Users to Tenant
After creating a tenant, users can be added to define who will have access and what role they will play in that tenant
environment.
#### Steps to Edit
* Click on the pencil icon beside the tenant name.
* Modify the name as needed, adhering to naming conventions.
* Changes are reflected immediately across the platform where the tenant is referenced.
Editing the tenant name is useful for renaming teams, aligning with rebranding, or
correcting naming errors without deleting and recreating the tenant.
## Add Users to Tenant
After creating a tenant, users can be added to define who will have access and what role they will play in that tenant
environment.
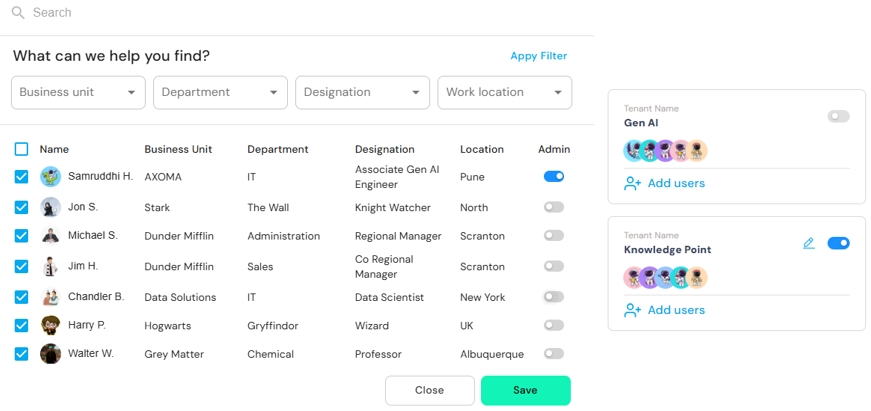 Within the Tenant Management module, Super Admins can assign users to specific tenants using the "Add Users" option available under each tenant card. This feature allows for efficient user distribution and controlled access across the platform.
#### Adding Users
* Click on Add Users under the desired Tenant Name.
* Use available filters (Business Unit, Department, Designation, Location) to locate users easily.
* Select users via checkboxes to assign them to the tenant.
* Click Save to finalize the user assignment.
#### Admin Role Toggle
Each user entry includes an Admin toggle that grants elevated permissions within the selected tenant.
* Assigning Admin Role:
Enabling the Admin toggle will prompt a confirmation message:
"You are about to assign the admin role to this user. This will grant them elevated permissions, including access to
platform-level administrative features across tenants where applicable. Are you sure you want to continue?"
On confirmation, the user is granted Admin rights (if not already assigned).
* Revoking Admin Role:
Disabling the Admin toggle prompts a warning:
"You are about to revoke this user's admin access for the selected tenant. If this user is not an admin in any other tenant,
their admin role will also be removed, and they will lose elevated access across the platform. Are you sure you want to continue?"
A system check is performed to verify if the user is an Admin in other tenants before fully revoking the Admin role.
#### 🔹 New Enhancement: Tenant Admin Assignment
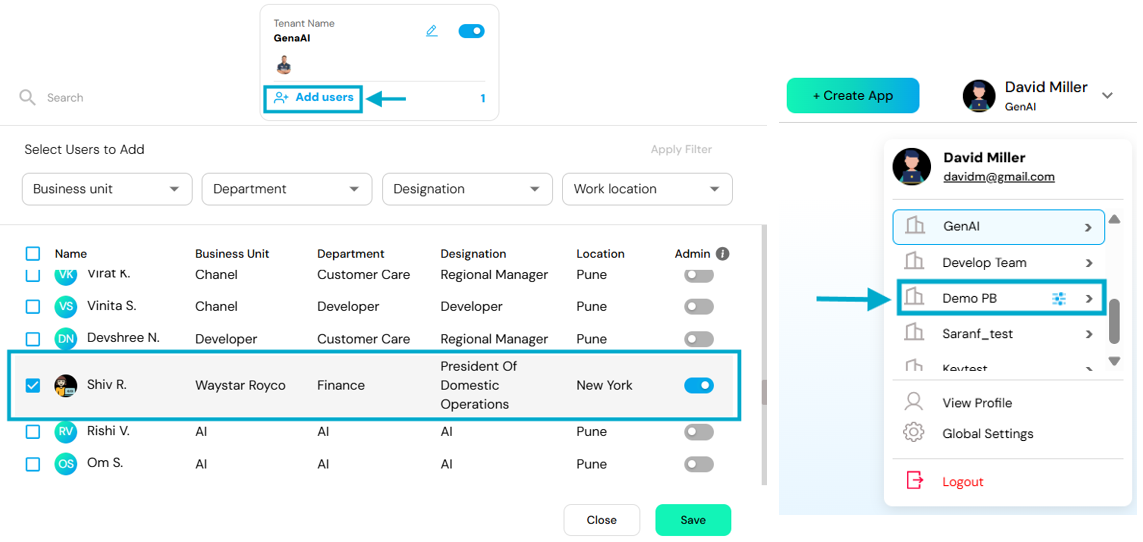
When a Super Admin creates a new tenant (e.g., “GenAI Tenant”), they can add users to that tenant.
While adding users, a popup window appears displaying user details such as Name, Department, Designation, and Location.
Here, the Super Admin can:
* Enable the Admin toggle for selected users.
* Once turned ON, that user becomes a Tenant Admin.
Within the Tenant Management module, Super Admins can assign users to specific tenants using the "Add Users" option available under each tenant card. This feature allows for efficient user distribution and controlled access across the platform.
#### Adding Users
* Click on Add Users under the desired Tenant Name.
* Use available filters (Business Unit, Department, Designation, Location) to locate users easily.
* Select users via checkboxes to assign them to the tenant.
* Click Save to finalize the user assignment.
#### Admin Role Toggle
Each user entry includes an Admin toggle that grants elevated permissions within the selected tenant.
* Assigning Admin Role:
Enabling the Admin toggle will prompt a confirmation message:
"You are about to assign the admin role to this user. This will grant them elevated permissions, including access to
platform-level administrative features across tenants where applicable. Are you sure you want to continue?"
On confirmation, the user is granted Admin rights (if not already assigned).
* Revoking Admin Role:
Disabling the Admin toggle prompts a warning:
"You are about to revoke this user's admin access for the selected tenant. If this user is not an admin in any other tenant,
their admin role will also be removed, and they will lose elevated access across the platform. Are you sure you want to continue?"
A system check is performed to verify if the user is an Admin in other tenants before fully revoking the Admin role.
#### 🔹 New Enhancement: Tenant Admin Assignment
When a Super Admin creates a new tenant (e.g., “GenAI Tenant”), they can add users to that tenant.
While adding users, a popup window appears displaying user details such as Name, Department, Designation, and Location.
Here, the Super Admin can:
* Enable the Admin toggle for selected users.
* Once turned ON, that user becomes a Tenant Admin.
 Tenant Admins gain exclusive access to:
* The [Groups](https://localhost:3000/app%20settings/security#groups) section
* The [Access Rights](https://localhost:3000/app%20settings/security#access-rights) section
After activation, a special icon appears next to the tenant name, indicating that the tenant now has an active Admin user.
## Enable or Disable a Tenant
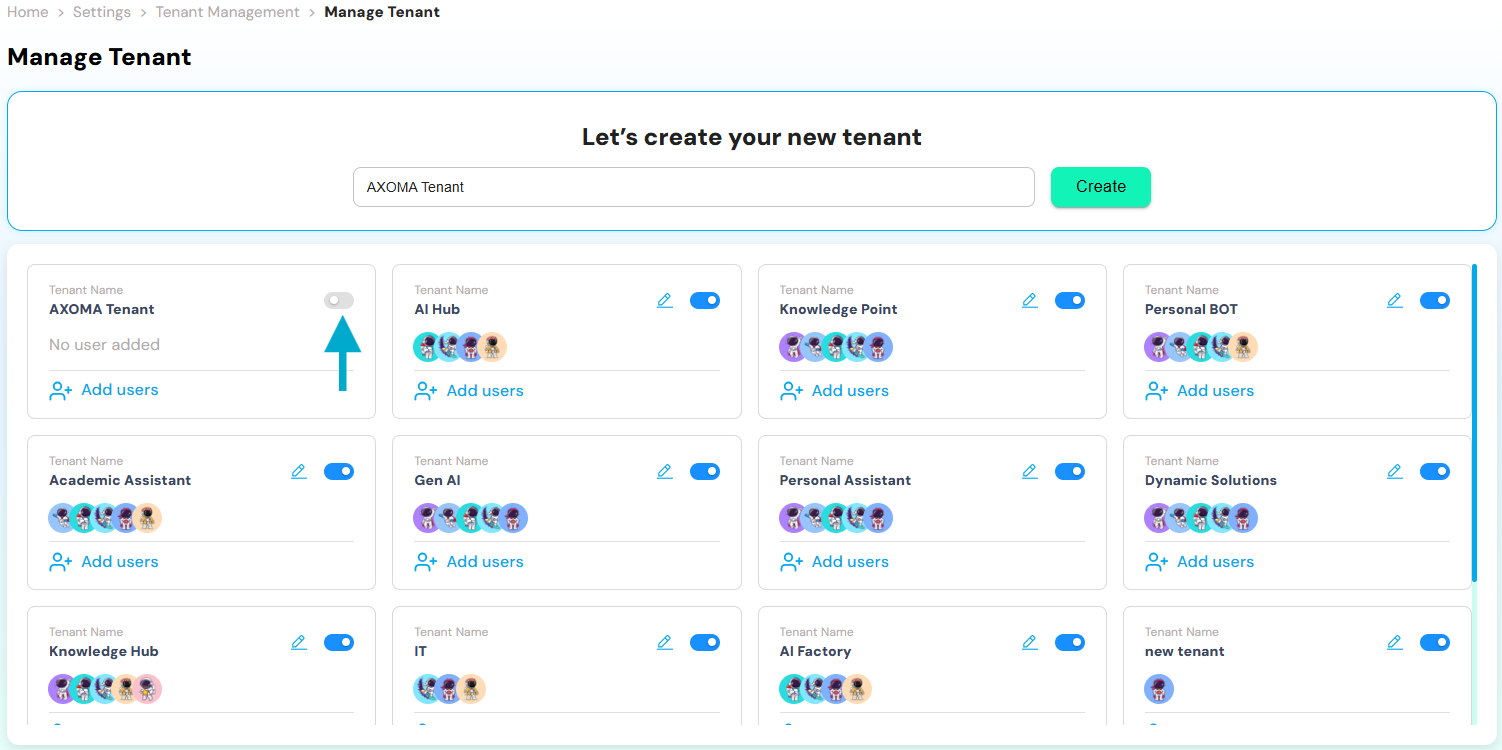
Each tenant card includes a toggle switch that allows Super Admins to activate or deactivate the tenant.
Tenant Admins gain exclusive access to:
* The [Groups](https://localhost:3000/app%20settings/security#groups) section
* The [Access Rights](https://localhost:3000/app%20settings/security#access-rights) section
After activation, a special icon appears next to the tenant name, indicating that the tenant now has an active Admin user.
## Enable or Disable a Tenant
Each tenant card includes a toggle switch that allows Super Admins to activate or deactivate the tenant.
 #### Functionality
* Enabled (Toggle On): The tenant is active. Assigned users can access its associated data, tools, and configurations.
* Disabled (Toggle Off): The tenant is inactive. All user access is restricted, but the tenant and its data are preserved.
This is useful for temporarily suspending a workspace during restructuring, compliance checks, or inactivity without
permanently deleting tenant data.
#### Functionality
* Enabled (Toggle On): The tenant is active. Assigned users can access its associated data, tools, and configurations.
* Disabled (Toggle Off): The tenant is inactive. All user access is restricted, but the tenant and its data are preserved.
This is useful for temporarily suspending a workspace during restructuring, compliance checks, or inactivity without
permanently deleting tenant data.