> ## Documentation Index
> Fetch the complete documentation index at: https://docs.axoma.ai/llms.txt
> Use this file to discover all available pages before exploring further.
# Agent Development
At the core of AXOMA’s intelligence layer lies the Agent Management System, enabling Admins and Super Admins to create
intelligent AI agents tailored to specific enterprise workflows and needs. These agents function as smart assistants capable
of automating tasks, retrieving information, and integrating seamlessly with enterprise tools such as Salesforce, ServiceNow,
Jira, and many more all without writing complex code.
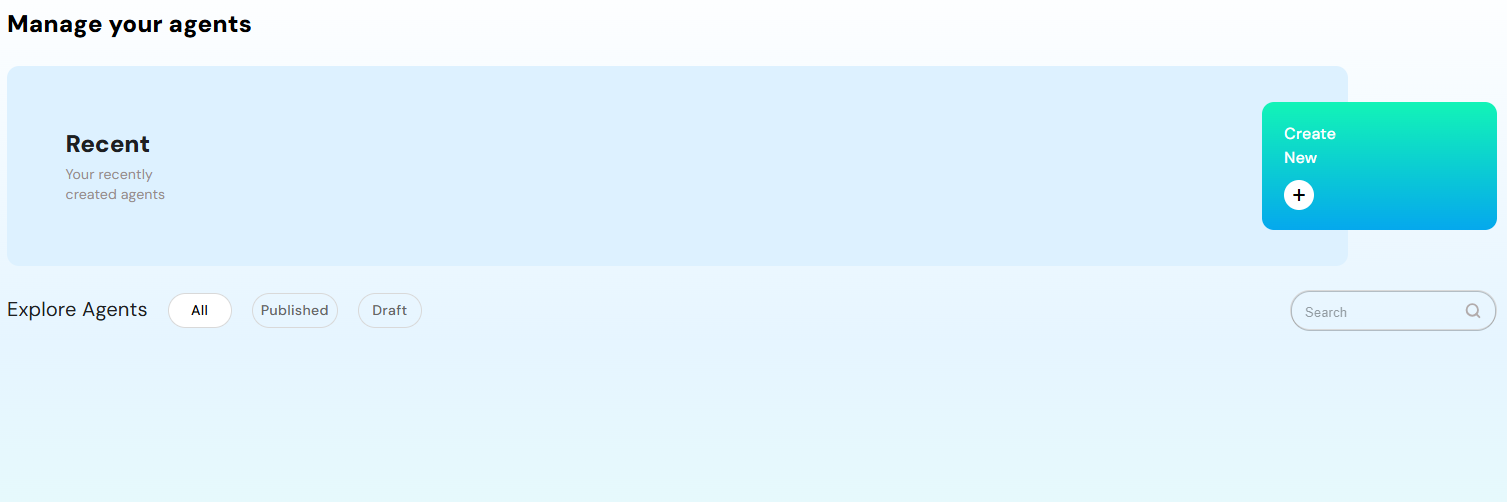 ## Step 1: Creating an Agent:
Creating an agent in AXOMA is a streamlined four-step process designed for flexibility, control, and seamless integration:
## Step 1: Creating an Agent:
Creating an agent in AXOMA is a streamlined four-step process designed for flexibility, control, and seamless integration:
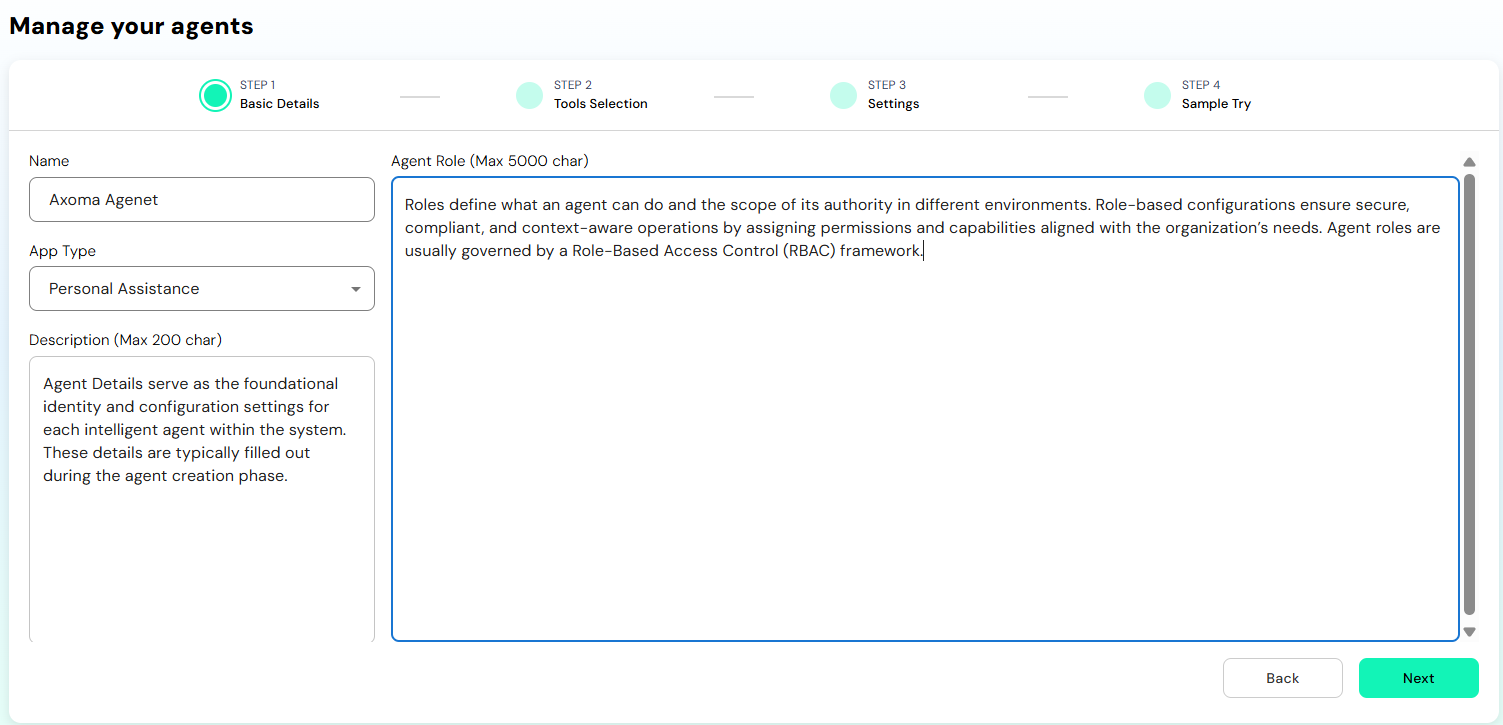 Define Agent Metadata : Begin by specifying the foundational details of your agent:
* Agent Name and Description
* Agent role The agent will represent (e.g., Support Assistant, Automation Bot)
* App Type Personal Assistant
Note: Additional app types such as
Conversational Assistant,
Automation Agent,
Knowledge Retriever,
will be available in the next update.
This helps define the purpose and behaviour of the agent within your enterprise environment.
## Step 2: Select Tools & Integrations
After completing Step 1 (Basic Details) in the Agent Management workflow, users proceed to Step 2: Tool Selection, where
they can integrate third-party tools and platforms into the agent's capabilities. This step enables agents to interact with
external systems like Google Drive, Gmail, Jira, Salesforce, ServiceNow, and others by securely connecting through APIs.
Define Agent Metadata : Begin by specifying the foundational details of your agent:
* Agent Name and Description
* Agent role The agent will represent (e.g., Support Assistant, Automation Bot)
* App Type Personal Assistant
Note: Additional app types such as
Conversational Assistant,
Automation Agent,
Knowledge Retriever,
will be available in the next update.
This helps define the purpose and behaviour of the agent within your enterprise environment.
## Step 2: Select Tools & Integrations
After completing Step 1 (Basic Details) in the Agent Management workflow, users proceed to Step 2: Tool Selection, where
they can integrate third-party tools and platforms into the agent's capabilities. This step enables agents to interact with
external systems like Google Drive, Gmail, Jira, Salesforce, ServiceNow, and others by securely connecting through APIs.
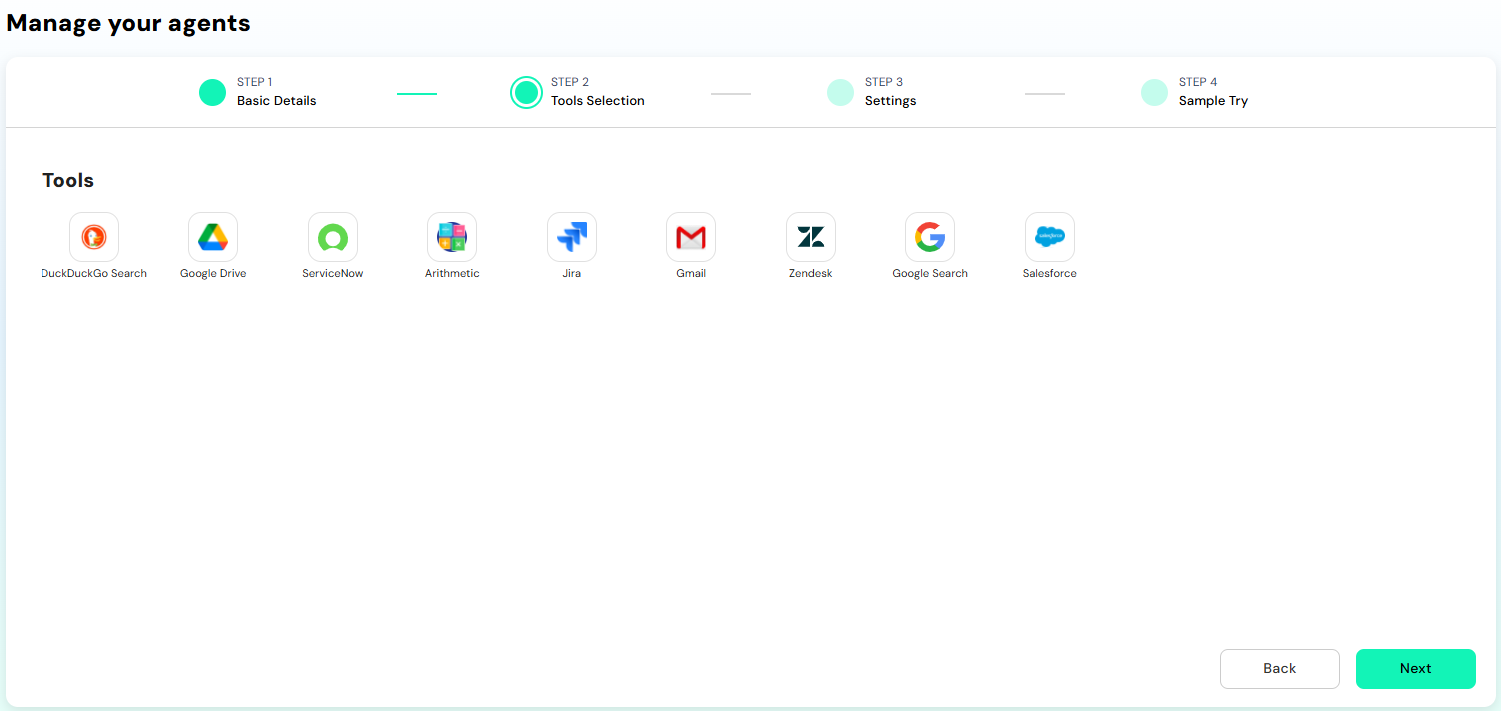 #### General Credentials Configuration
Steps to Ensure:
* Credential Verification is mandatory before saving.
* At least one action must be toggled ON to enable the Save button.
* This modular configuration allows agents to be highly customized based on use case.
* Proper action selection ensures agents don’t have unnecessary or unsafe permissions, aligning with secure and responsible AI practices.
#### General Credentials Configuration
Steps to Ensure:
* Credential Verification is mandatory before saving.
* At least one action must be toggled ON to enable the Save button.
* This modular configuration allows agents to be highly customized based on use case.
* Proper action selection ensures agents don’t have unnecessary or unsafe permissions, aligning with secure and responsible AI practices.
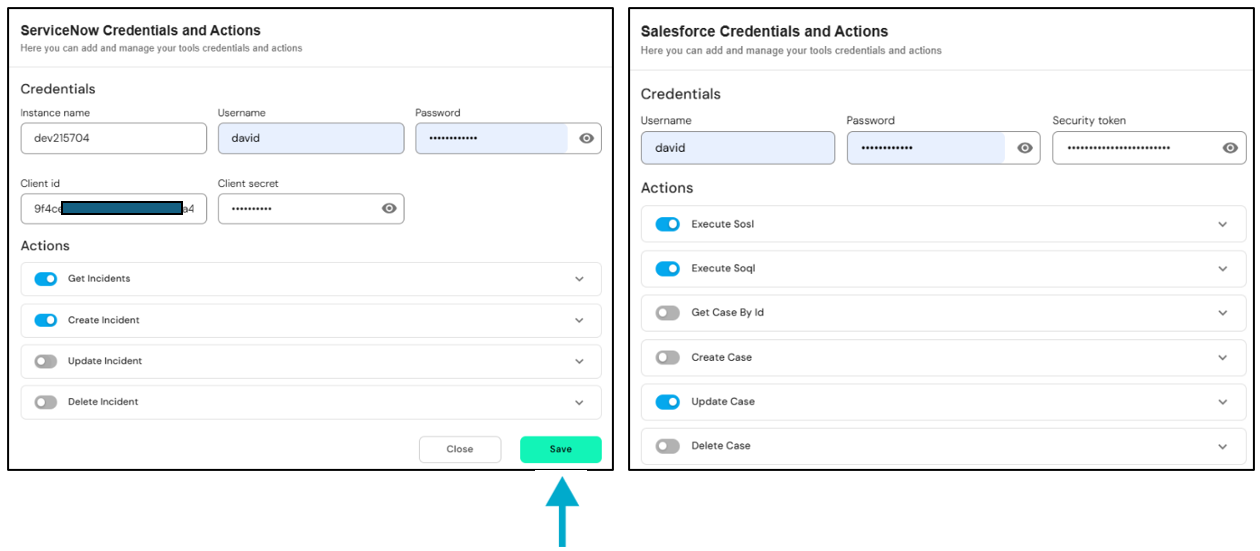 #### Tools
The interface displays a grid of tool icons, each representing an available integration. Tools include:
Enter Credentials
* No credential inputs are required for DuckDuckGo as it is a public search engine API integration.
Action Permissions
* Below the header is the Actions panel that allows the user to define the functionalities available to the agent through DuckDuckGo. The available actions are:
* DuckDuckGo Instant Search – Returns quick, concise search results.
* DuckDuckGo Full Search – Performs a more comprehensive and deeper search.
Each action is presented with a toggle switch. At least one action must be enabled before proceeding. This ensures the agent can interact meaningfully with the DuckDuckGo search service.
Save Configuration
* Once at least one action is toggled ON, the user can click the “Save” button to finalize and store the DuckDuckGo integration.
For further information visit [DuckDuckGo official Website](https://duckduckgo.com/)
Upon selecting a tool (e.g., Google Drive), a popup window appears titled “Google Drive Credentials and Actions.” This modal
allows users to:
* Enter Credentials
* Client ID
* Client Secret
These credentials are required to authenticate the connection between the agent and the selected service using OAuth
or API key-based authentication.
Once the credentials are filled, users must click the "Verify" button to confirm that the provided credentials
are valid and can connect to the external service. The button turns green to indicate successful verification.
Action Permissions
Below the credentials section is the "Actions" panel. This defines what operations the agent will be allowed to
perform via the selected integration.
For Google Drive, the available actions include:
* Copy File to Folder
* Upload File
* Delete File
* Create Folder
* File Access to User
* Create File Sharing Link
* Download File
Each action is presented as a toggle switch. The system enforces a validation rule that at least one action must
be enabled (toggled ON) before allowing the user to save and proceed. This ensures the agent has meaningful permissions assigned for the integration.
Save Configuration
Once The credentials are verified, At least one action is enabled, the user can click on the "Save" button. This will store
the integration settings and associate them with the agent’s configuration.
For further information visit [Google](https://developers.google.com/identity/protocols/oauth2)
Enter Credentials
To authenticate the agent’s access to ServiceNow, the following fields must be completed:
* Instance Name – Domain name of your ServiceNow instance (e.g., xyz.service-now\.com)
* Username – ServiceNow username for API access.
* Password – Password associated with the entered username (secured and masked).
* Client ID – OAuth Client ID from your ServiceNow app registration.
* Client Secret – Corresponding OAuth Client Secret.
Click the “Verify” button after filling in all required fields. A green indicator confirms a successful connection with ServiceNow’s API.
Action Permissions
* Available actions include:
* Get Incidents
* Update Incident
* Delete Incident
* Create Incident
All actions are presented with toggle switches. At least one action must be enabled for successful configuration.
Save Configuration
* Once the credentials are verified and at least one action is toggled ON, the user can click “Save” to
complete the integration setup.
For further information visit [Salesforce](https://www.servicenow.com/docs/bundle/yokohama-platform-security/page/administer/security/task/t_CreateEndpointforExternalClients.html)
Jira – Credentials and Actions
Enter Credentials
To connect the agent to your Jira instance, enter the following:
* Client ID – Usually an email or Jira user identifier.
* Client Secret – The API token or secret obtained from Jira's developer settings.
Verify Credentials
Click the “Verify” button to authenticate the credentials. Successful verification turns the button green, indicating readiness.
Action Permissions
These define what the agent can do within Jira. Available actions include:
`Create Jira Issue`
`Jira Comments Query`
`Jira Issues Search`
`Upload Attachment`
`Jira Issue Query`
`List Attachments`
`Search Issues By JQL`
`Jira All Projects`
`Get Board Issues`
`Add Comment`
Each is represented by a toggle switch, and enabling at least one action is mandatory.
Save Configuration
Once verification is successful and at least one action is enabled, click “Save” to finalize the configuration.
For further information visit [Jira](https://developer.atlassian.com/cloud/jira/platform/oauth-2-3lo-apps/)
Gmail Credentials and Actions
Enter Credentials To connect the agent to your Gmail instance, enter the following:
`Google Drive Client ID` Unique identifier for Gmail OAuth.
`Google Drive Client Secret` Secret token tied to the client ID for authentication.
Verify Credentials
Once credentials are added, clicking the Verify button will authenticate the integration. A green button confirms a successful connection.
Action Permissions
Available actions:
`Update Draft`
`Search Messages`
`Send Draft`
`Create Draft`
`Send Email`
`Get Draft`
Users must toggle at least one action ON to proceed. These toggles control what Gmail operations the agent is allowed to perform.
Save Configuration
After verification and enabling actions, click "Save" to finalize and link the integration to the agent.
For further information visit [Google](https://developers.google.com/identity/protocols/oauth2)
Zendesk Credentials and Actions
Used to integrate Zendesk customer support operations with the agent.
Enter Credentials
`Sub Domain` Zendesk instance subdomain.
`Client ID`Provided via Zendesk Developer portal.
`Scopes` Define permissions for accessing specific Zendesk data.
Verify Credentials
Click Verify to validate connection. Success is indicated with a green button.
Action Permissions Available actions:
`Search Zendesk`
`Create Ticket`
`Search Ticket by ID`
`Update Tickets`
At least one action must be toggled ON before proceeding.
Save Configuration
Post verification and action selection, click "Save" to apply changes to the agent’s settings.
For further information visit [Zendesk](https://support.zendesk.com/hc/en-us/articles/4408845965210-Using-OAuth-authentication-with-your-application)
Google Search Credentials and Actions
Facilitates the agent's access to Google Search APIs.
Enter Credentials
`Google Cloud API Key` Used for programmatic access.
`Search Engine ID` Custom search engine identifier.
`Max Number of Results` Cap on number of search results returned.
Verify Credentials
Verification ensures the API key and engine ID are functional.
Available actions:
`Google Search`
`Filter Results by Domain`
`Extract URLs`
`Get Search Titles`
`Google Search JSON`
At least one action must be toggled ON for the integration to be saved.
Save Configuration
After setup, click "Save" to store the settings.
For further information visit [Google](https://developers.google.com/identity/protocols/oauth2)
Salesforce Credentials and Actions
Used to configure access to Salesforce CRM via the agent.
Enter Credentials
`Client ID` From Salesforce app.
`Client Secret` Secret corresponding to the app credentials.
Verify Credentials
Verification ensures that the agent can authenticate against Salesforce APIs.
Action Permissions Available actions include:
`Create/Update/Delete` Account, Contact, Case, Service Contract
`Get by ID` Case, Contact, Account, Service Contract
`Execute` SOSL, SOQL Queries
Save Configuration
After verification and action selection, click on "Save" button.
For further information visit [Salesforce](https://help.salesforce.com/s/articleView?id=xcloud.connected_app_create_api_integration.htm\&type=5)
Arithmetic Tool – Credentials and Actions
No credential input is required since this is an internal, logic-based tool for mathematical operations.
Action Permissions
The Actions panel offers a wide range of arithmetic functionalities that the agent can use:
`Modulus`
`GCD`
`Multiply`
`Power`
`Round Number`
`Logarithm`
`Add`
`Square Root`
`Absolute`
`Divide`
`Floor Divide`
`Factorial`
All actions are toggle-enabled. At least one action must be turned ON to proceed.
Save Configuration
After selecting at least one operation, click “Save” to store the action preferences for arithmetic support.
Users can click on any of these icons to initiate integration. Each tool represents a set of pre-defined actions that the agent can perform once the necessary credentials are validated.
To enable secure and seamless connectivity with external systems such as DuckDuckGo, Google Drive, ServiceNow,
Arithmetic, Edgematics MyHR, Jira, Gmail, Zendesk, and Salesforce, our Agent Management service supports OAuth-based integrations.
These tools empower agents to perform read, write, and action-oriented tasks across platforms—enabling real-time
orchestration of enterprise operations.
For step-by-step instructions on how to configure OAuth credentials for each of these integrations,
please refer to the OAuth Integration Setup section provided at the end of all services.
Transition to Step 3: Settings
After successfully saving the tool configuration, the user is returned to the main Tool Selection screen. They can either:
* Add more tools (repeat the same process),
* Or click the “Next” button at the bottom-right to proceed to Step 3: Settings.
This ensures agents are equipped with the correct integrations before moving on to feature toggles and responsible AI
configurations.
## Step 3: Attach Knowledge Base & Configure Memory
Enhance agent performance with contextual understanding and memory management:
* Attach Knowledge Base to ground the agent in relevant data
* Configure:
* Short-Term Memory for ongoing conversations or current session tasks
* Long-Term Memory to retain history, learnings, or strategy-related information
#### Tools
The interface displays a grid of tool icons, each representing an available integration. Tools include:
Enter Credentials
* No credential inputs are required for DuckDuckGo as it is a public search engine API integration.
Action Permissions
* Below the header is the Actions panel that allows the user to define the functionalities available to the agent through DuckDuckGo. The available actions are:
* DuckDuckGo Instant Search – Returns quick, concise search results.
* DuckDuckGo Full Search – Performs a more comprehensive and deeper search.
Each action is presented with a toggle switch. At least one action must be enabled before proceeding. This ensures the agent can interact meaningfully with the DuckDuckGo search service.
Save Configuration
* Once at least one action is toggled ON, the user can click the “Save” button to finalize and store the DuckDuckGo integration.
For further information visit [DuckDuckGo official Website](https://duckduckgo.com/)
Upon selecting a tool (e.g., Google Drive), a popup window appears titled “Google Drive Credentials and Actions.” This modal
allows users to:
* Enter Credentials
* Client ID
* Client Secret
These credentials are required to authenticate the connection between the agent and the selected service using OAuth
or API key-based authentication.
Once the credentials are filled, users must click the "Verify" button to confirm that the provided credentials
are valid and can connect to the external service. The button turns green to indicate successful verification.
Action Permissions
Below the credentials section is the "Actions" panel. This defines what operations the agent will be allowed to
perform via the selected integration.
For Google Drive, the available actions include:
* Copy File to Folder
* Upload File
* Delete File
* Create Folder
* File Access to User
* Create File Sharing Link
* Download File
Each action is presented as a toggle switch. The system enforces a validation rule that at least one action must
be enabled (toggled ON) before allowing the user to save and proceed. This ensures the agent has meaningful permissions assigned for the integration.
Save Configuration
Once The credentials are verified, At least one action is enabled, the user can click on the "Save" button. This will store
the integration settings and associate them with the agent’s configuration.
For further information visit [Google](https://developers.google.com/identity/protocols/oauth2)
Enter Credentials
To authenticate the agent’s access to ServiceNow, the following fields must be completed:
* Instance Name – Domain name of your ServiceNow instance (e.g., xyz.service-now\.com)
* Username – ServiceNow username for API access.
* Password – Password associated with the entered username (secured and masked).
* Client ID – OAuth Client ID from your ServiceNow app registration.
* Client Secret – Corresponding OAuth Client Secret.
Click the “Verify” button after filling in all required fields. A green indicator confirms a successful connection with ServiceNow’s API.
Action Permissions
* Available actions include:
* Get Incidents
* Update Incident
* Delete Incident
* Create Incident
All actions are presented with toggle switches. At least one action must be enabled for successful configuration.
Save Configuration
* Once the credentials are verified and at least one action is toggled ON, the user can click “Save” to
complete the integration setup.
For further information visit [Salesforce](https://www.servicenow.com/docs/bundle/yokohama-platform-security/page/administer/security/task/t_CreateEndpointforExternalClients.html)
Jira – Credentials and Actions
Enter Credentials
To connect the agent to your Jira instance, enter the following:
* Client ID – Usually an email or Jira user identifier.
* Client Secret – The API token or secret obtained from Jira's developer settings.
Verify Credentials
Click the “Verify” button to authenticate the credentials. Successful verification turns the button green, indicating readiness.
Action Permissions
These define what the agent can do within Jira. Available actions include:
`Create Jira Issue`
`Jira Comments Query`
`Jira Issues Search`
`Upload Attachment`
`Jira Issue Query`
`List Attachments`
`Search Issues By JQL`
`Jira All Projects`
`Get Board Issues`
`Add Comment`
Each is represented by a toggle switch, and enabling at least one action is mandatory.
Save Configuration
Once verification is successful and at least one action is enabled, click “Save” to finalize the configuration.
For further information visit [Jira](https://developer.atlassian.com/cloud/jira/platform/oauth-2-3lo-apps/)
Gmail Credentials and Actions
Enter Credentials To connect the agent to your Gmail instance, enter the following:
`Google Drive Client ID` Unique identifier for Gmail OAuth.
`Google Drive Client Secret` Secret token tied to the client ID for authentication.
Verify Credentials
Once credentials are added, clicking the Verify button will authenticate the integration. A green button confirms a successful connection.
Action Permissions
Available actions:
`Update Draft`
`Search Messages`
`Send Draft`
`Create Draft`
`Send Email`
`Get Draft`
Users must toggle at least one action ON to proceed. These toggles control what Gmail operations the agent is allowed to perform.
Save Configuration
After verification and enabling actions, click "Save" to finalize and link the integration to the agent.
For further information visit [Google](https://developers.google.com/identity/protocols/oauth2)
Zendesk Credentials and Actions
Used to integrate Zendesk customer support operations with the agent.
Enter Credentials
`Sub Domain` Zendesk instance subdomain.
`Client ID`Provided via Zendesk Developer portal.
`Scopes` Define permissions for accessing specific Zendesk data.
Verify Credentials
Click Verify to validate connection. Success is indicated with a green button.
Action Permissions Available actions:
`Search Zendesk`
`Create Ticket`
`Search Ticket by ID`
`Update Tickets`
At least one action must be toggled ON before proceeding.
Save Configuration
Post verification and action selection, click "Save" to apply changes to the agent’s settings.
For further information visit [Zendesk](https://support.zendesk.com/hc/en-us/articles/4408845965210-Using-OAuth-authentication-with-your-application)
Google Search Credentials and Actions
Facilitates the agent's access to Google Search APIs.
Enter Credentials
`Google Cloud API Key` Used for programmatic access.
`Search Engine ID` Custom search engine identifier.
`Max Number of Results` Cap on number of search results returned.
Verify Credentials
Verification ensures the API key and engine ID are functional.
Available actions:
`Google Search`
`Filter Results by Domain`
`Extract URLs`
`Get Search Titles`
`Google Search JSON`
At least one action must be toggled ON for the integration to be saved.
Save Configuration
After setup, click "Save" to store the settings.
For further information visit [Google](https://developers.google.com/identity/protocols/oauth2)
Salesforce Credentials and Actions
Used to configure access to Salesforce CRM via the agent.
Enter Credentials
`Client ID` From Salesforce app.
`Client Secret` Secret corresponding to the app credentials.
Verify Credentials
Verification ensures that the agent can authenticate against Salesforce APIs.
Action Permissions Available actions include:
`Create/Update/Delete` Account, Contact, Case, Service Contract
`Get by ID` Case, Contact, Account, Service Contract
`Execute` SOSL, SOQL Queries
Save Configuration
After verification and action selection, click on "Save" button.
For further information visit [Salesforce](https://help.salesforce.com/s/articleView?id=xcloud.connected_app_create_api_integration.htm\&type=5)
Arithmetic Tool – Credentials and Actions
No credential input is required since this is an internal, logic-based tool for mathematical operations.
Action Permissions
The Actions panel offers a wide range of arithmetic functionalities that the agent can use:
`Modulus`
`GCD`
`Multiply`
`Power`
`Round Number`
`Logarithm`
`Add`
`Square Root`
`Absolute`
`Divide`
`Floor Divide`
`Factorial`
All actions are toggle-enabled. At least one action must be turned ON to proceed.
Save Configuration
After selecting at least one operation, click “Save” to store the action preferences for arithmetic support.
Users can click on any of these icons to initiate integration. Each tool represents a set of pre-defined actions that the agent can perform once the necessary credentials are validated.
To enable secure and seamless connectivity with external systems such as DuckDuckGo, Google Drive, ServiceNow,
Arithmetic, Edgematics MyHR, Jira, Gmail, Zendesk, and Salesforce, our Agent Management service supports OAuth-based integrations.
These tools empower agents to perform read, write, and action-oriented tasks across platforms—enabling real-time
orchestration of enterprise operations.
For step-by-step instructions on how to configure OAuth credentials for each of these integrations,
please refer to the OAuth Integration Setup section provided at the end of all services.
Transition to Step 3: Settings
After successfully saving the tool configuration, the user is returned to the main Tool Selection screen. They can either:
* Add more tools (repeat the same process),
* Or click the “Next” button at the bottom-right to proceed to Step 3: Settings.
This ensures agents are equipped with the correct integrations before moving on to feature toggles and responsible AI
configurations.
## Step 3: Attach Knowledge Base & Configure Memory
Enhance agent performance with contextual understanding and memory management:
* Attach Knowledge Base to ground the agent in relevant data
* Configure:
* Short-Term Memory for ongoing conversations or current session tasks
* Long-Term Memory to retain history, learnings, or strategy-related information
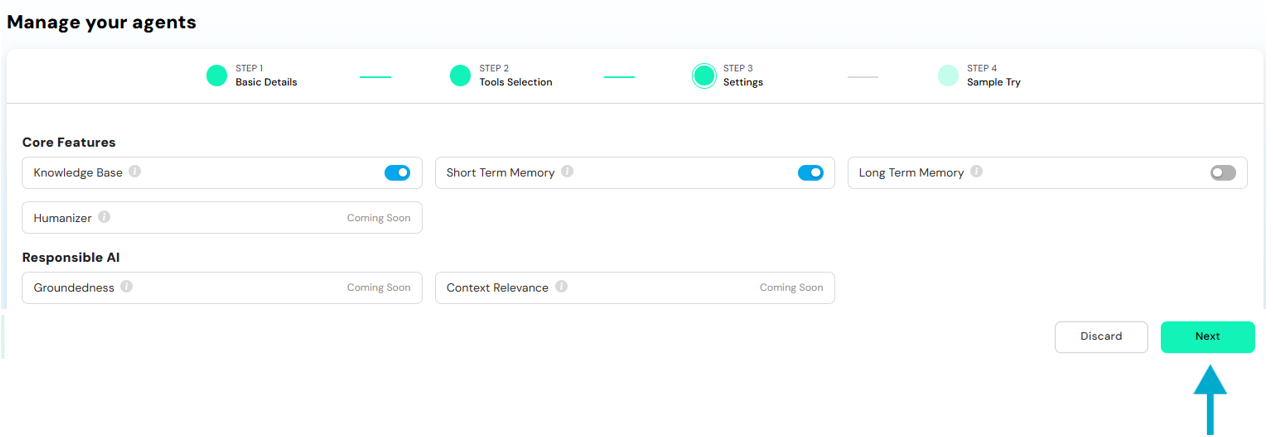 This ensures agents reason effectively using both immediate and historical context.
## Step 4: Test & Deploy
Before going live, test the agent in a secure sandbox environment to:
* Verify integration accuracy
* Tune response behaviour
* Validate tool actions and memory configurations
This ensures agents reason effectively using both immediate and historical context.
## Step 4: Test & Deploy
Before going live, test the agent in a secure sandbox environment to:
* Verify integration accuracy
* Tune response behaviour
* Validate tool actions and memory configurations
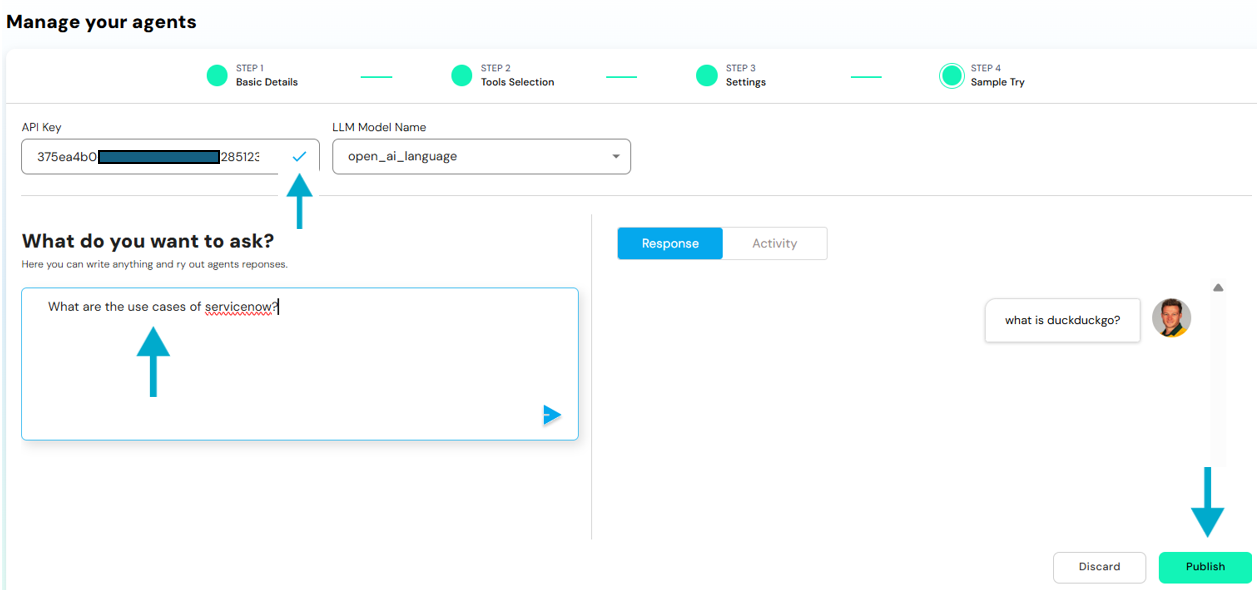 Once tested and confirmed, the agent can be published and is ready to be deployed across apps within the AXOMA platform.