


Step 1: Creating an Agent:
Creating an agent in AXOMA is a streamlined four-step process designed for flexibility, control, and seamless integration: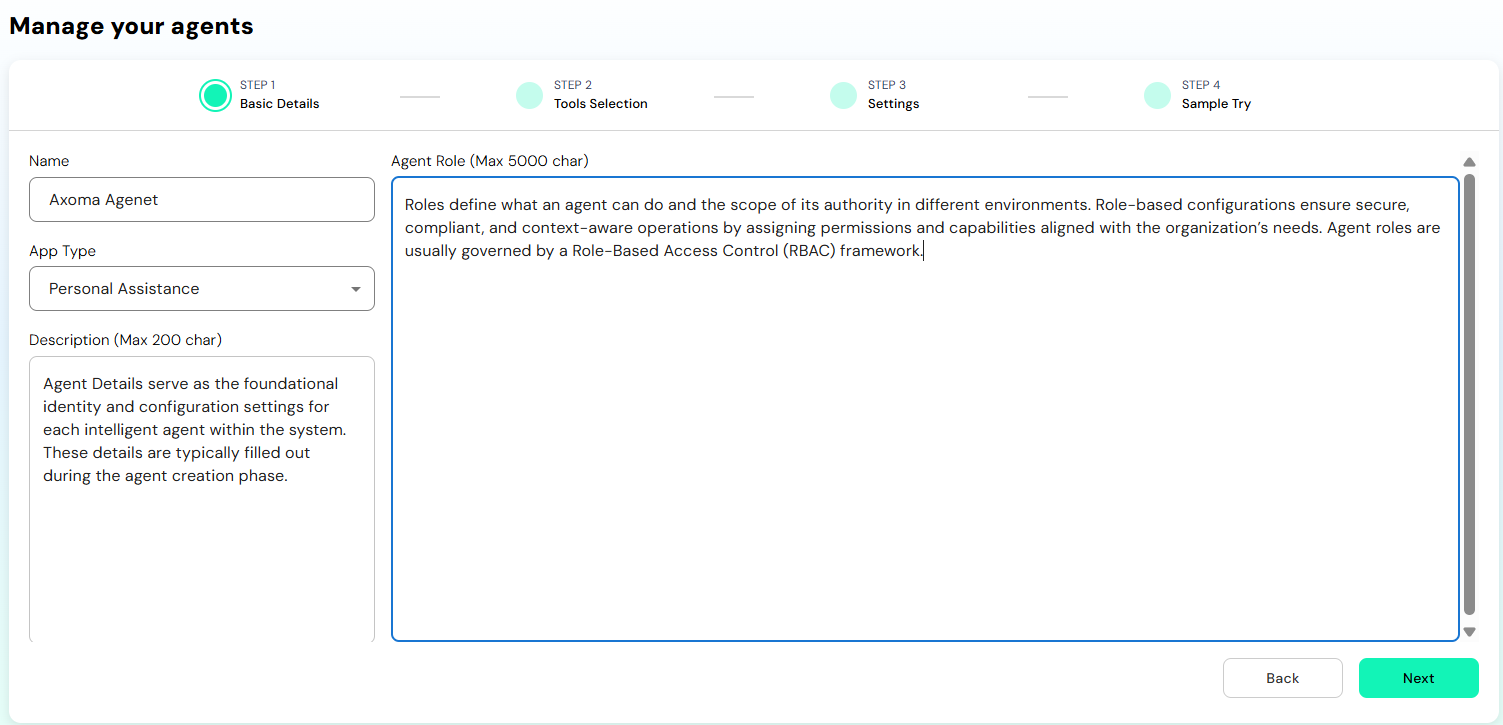 Define Agent Metadata : Begin by specifying the foundational details of your agent:
- Agent Name and Description
- Agent role The agent will represent (e.g., Support Assistant, Automation Bot)
- App Type Personal Assistant
Note: Additional app types such as
Conversational Assistant,
Automation Agent,
Knowledge Retriever,
will be available in the next update.
Step 2: Select Tools & Integrations
After completing Step 1 (Basic Details) in the Agent Management workflow, users proceed to Step 2: Tool Selection, where they can integrate third-party tools and platforms into the agent’s capabilities. This step enables agents to interact with external systems like Google Drive, Gmail, Jira, Salesforce, ServiceNow, and others by securely connecting through APIs.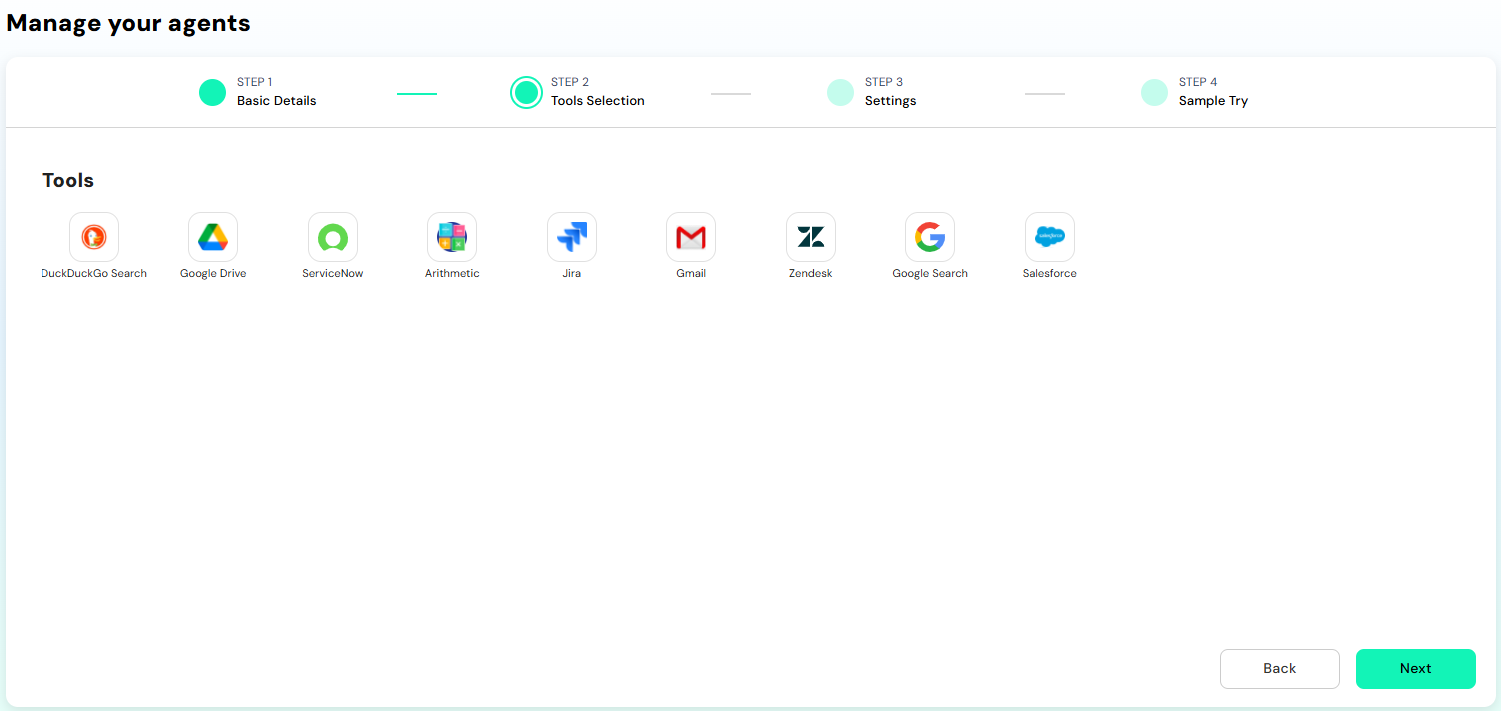
General Credentials Configuration
Steps to Ensure:- Credential Verification is mandatory before saving.
- At least one action must be toggled ON to enable the Save button.
- This modular configuration allows agents to be highly customized based on use case.
- Proper action selection ensures agents don’t have unnecessary or unsafe permissions, aligning with secure and responsible AI practices.
Tools
The interface displays a grid of tool icons, each representing an available integration. Tools include:DuckDuckGo Search
DuckDuckGo Search
Enter Credentials
- No credential inputs are required for DuckDuckGo as it is a public search engine API integration.
- Below the header is the Actions panel that allows the user to define the functionalities available to the agent through DuckDuckGo. The available actions are:
- DuckDuckGo Instant Search – Returns quick, concise search results.
- DuckDuckGo Full Search – Performs a more comprehensive and deeper search.
- Once at least one action is toggled ON, the user can click the “Save” button to finalize and store the DuckDuckGo integration.
Google Drive
Google Drive
Upon selecting a tool (e.g., Google Drive), a popup window appears titled “Google Drive Credentials and Actions.” This modal
allows users to:Action Permissions
Below the credentials section is the “Actions” panel. This defines what operations the agent will be allowed to
perform via the selected integration.For Google Drive, the available actions include:
- Enter Credentials
- Client ID
- Client Secret These credentials are required to authenticate the connection between the agent and the selected service using OAuth or API key-based authentication.
Once the credentials are filled, users must click the “Verify” button to confirm that the provided credentials
are valid and can connect to the external service. The button turns green to indicate successful verification.
- Copy File to Folder
- Upload File
- Delete File
- Create Folder
- File Access to User
- Create File Sharing Link
- Download File
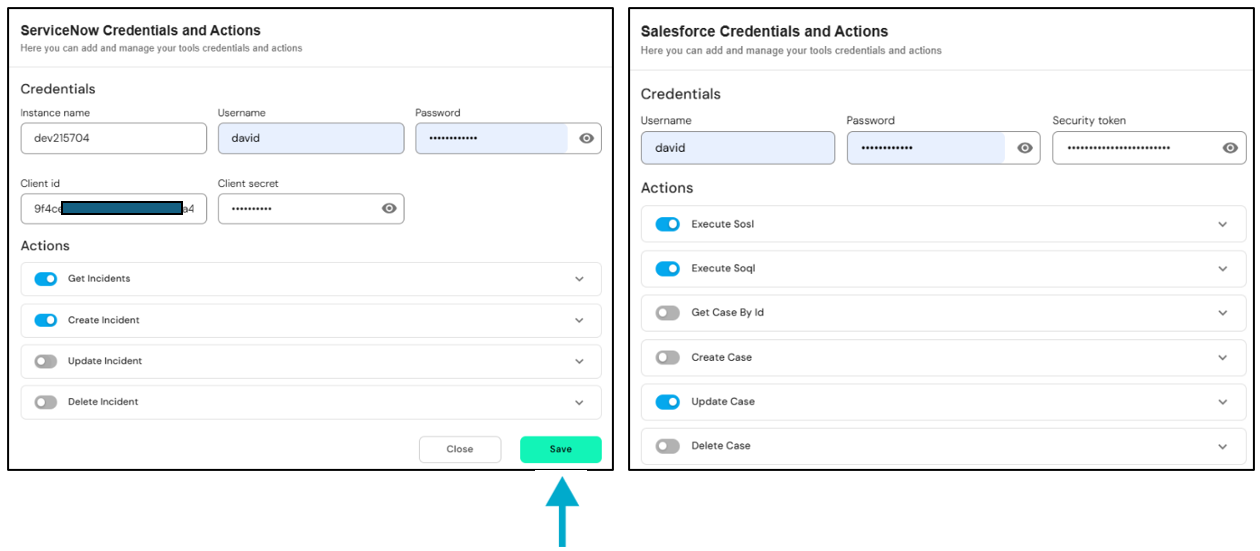
Servicenow
Servicenow
Enter Credentials
To authenticate the agent’s access to ServiceNow, the following fields must be completed:Action Permissions
- Instance Name – Domain name of your ServiceNow instance (e.g., xyz.service-now.com)
- Username – ServiceNow username for API access.
- Password – Password associated with the entered username (secured and masked).
- Client ID – OAuth Client ID from your ServiceNow app registration.
- Client Secret – Corresponding OAuth Client Secret.
Click the “Verify” button after filling in all required fields. A green indicator confirms a successful connection with ServiceNow’s API.
- Available actions include:
- Get Incidents
- Update Incident
- Delete Incident
- Create Incident
- Once the credentials are verified and at least one action is toggled ON, the user can click “Save” to complete the integration setup.
Jira
Jira
Jira – Credentials and ActionsEnter Credentials
To connect the agent to your Jira instance, enter the following:Action Permissions
These define what the agent can do within Jira. Available actions include:
- Client ID – Usually an email or Jira user identifier.
- Client Secret – The API token or secret obtained from Jira’s developer settings.
Verify Credentials
Click the “Verify” button to authenticate the credentials. Successful verification turns the button green, indicating readiness.
Create Jira IssueJira Comments QueryJira Issues SearchUpload AttachmentJira Issue QueryList AttachmentsSearch Issues By JQLJira All ProjectsGet Board IssuesAdd CommentEach is represented by a toggle switch, and enabling at least one action is mandatory.Save Configuration
Once verification is successful and at least one action is enabled, click “Save” to finalize the configuration.For further information visit JiraGmail
Gmail
Gmail Credentials and ActionsEnter Credentials To connect the agent to your Gmail instance, enter the following:Action Permissions
Available actions:
Google Drive Client ID Unique identifier for Gmail OAuth.Google Drive Client Secret Secret token tied to the client ID for authentication.Verify Credentials
Once credentials are added, clicking the Verify button will authenticate the integration. A green button confirms a successful connection.
Update DraftSearch MessagesSend DraftCreate DraftSend EmailGet DraftUsers must toggle at least one action ON to proceed. These toggles control what Gmail operations the agent is allowed to perform.Save Configuration
After verification and enabling actions, click “Save” to finalize and link the integration to the agent.For further information visit GoogleZendesk
Zendesk
Zendesk Credentials and Actions
Used to integrate Zendesk customer support operations with the agent.Enter Credentials
Action Permissions Available actions:Save Configuration
Post verification and action selection, click “Save” to apply changes to the agent’s settings.For further information visit Zendesk
Sub Domain Zendesk instance subdomain.Client IDProvided via Zendesk Developer portal.Scopes Define permissions for accessing specific Zendesk data.Verify Credentials
Click Verify to validate connection. Success is indicated with a green button.
Search ZendeskCreate TicketSearch Ticket by IDUpdate TicketsAt least one action must be toggled ON before proceeding.
Google Search
Google Search
Google Search Credentials and ActionsFacilitates the agent’s access to Google Search APIs.Enter Credentials
Available actions:Save Configuration
After setup, click “Save” to store the settings.For further information visit Google
Google Cloud API Key Used for programmatic access.Search Engine ID Custom search engine identifier.Max Number of Results Cap on number of search results returned.Verify Credentials
Verification ensures the API key and engine ID are functional.
Google SearchFilter Results by DomainExtract URLsGet Search TitlesGoogle Search JSONAt least one action must be toggled ON for the integration to be saved.
Salesforce
Salesforce
Salesforce Credentials and ActionsUsed to configure access to Salesforce CRM via the agent.Enter Credentials
Action Permissions Available actions include:
Client ID From Salesforce app.Client Secret Secret corresponding to the app credentials.Verify Credentials
Verification ensures that the agent can authenticate against Salesforce APIs.
Create/Update/Delete Account, Contact, Case, Service ContractGet by ID Case, Contact, Account, Service ContractExecute SOSL, SOQL QueriesSave Configuration
After verification and action selection, click on “Save” button.For further information visit SalesforceArithmatic
Arithmatic
Arithmetic Tool – Credentials and ActionsAction Permissions
The Actions panel offers a wide range of arithmetic functionalities that the agent can use:Save Configuration
After selecting at least one operation, click “Save” to store the action preferences for arithmetic support.
No credential input is required since this is an internal, logic-based tool for mathematical operations.
ModulusGCDMultiplyPowerRound NumberLogarithmAddSquare RootAbsoluteDivideFloor DivideFactorialAll actions are toggle-enabled. At least one action must be turned ON to proceed.
For step-by-step instructions on how to configure OAuth credentials for each of these integrations,
please refer to the OAuth Integration Setup section provided at the end of all services.
- Add more tools (repeat the same process),
- Or click the “Next” button at the bottom-right to proceed to Step 3: Settings.
Step 3: Attach Knowledge Base & Configure Memory
Enhance agent performance with contextual understanding and memory management:- Attach Knowledge Base to ground the agent in relevant data
- Configure:
- Short-Term Memory for ongoing conversations or current session tasks
- Long-Term Memory to retain history, learnings, or strategy-related information
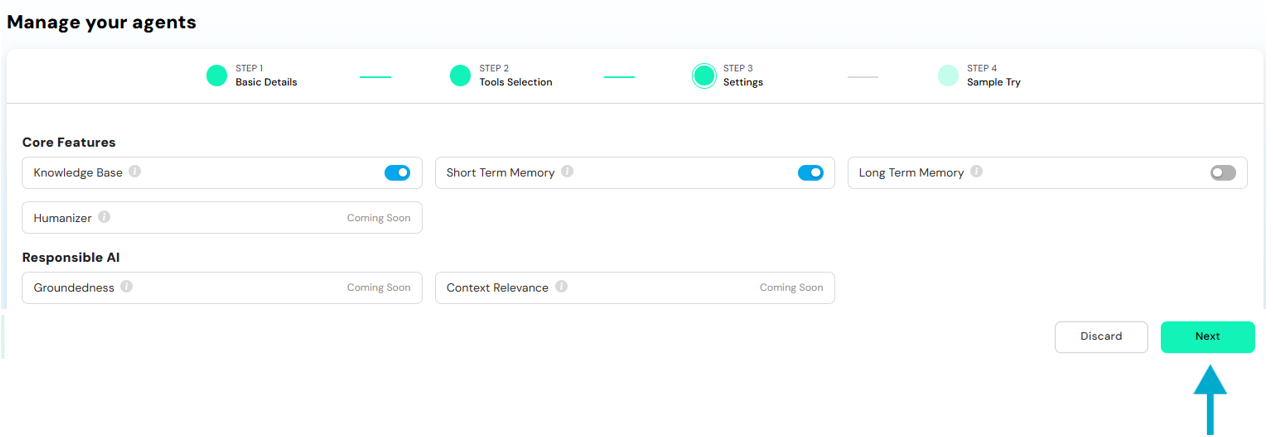 This ensures agents reason effectively using both immediate and historical context.
Step 4: Test & Deploy
Before going live, test the agent in a secure sandbox environment to:- Verify integration accuracy
- Tune response behaviour
- Validate tool actions and memory configurations
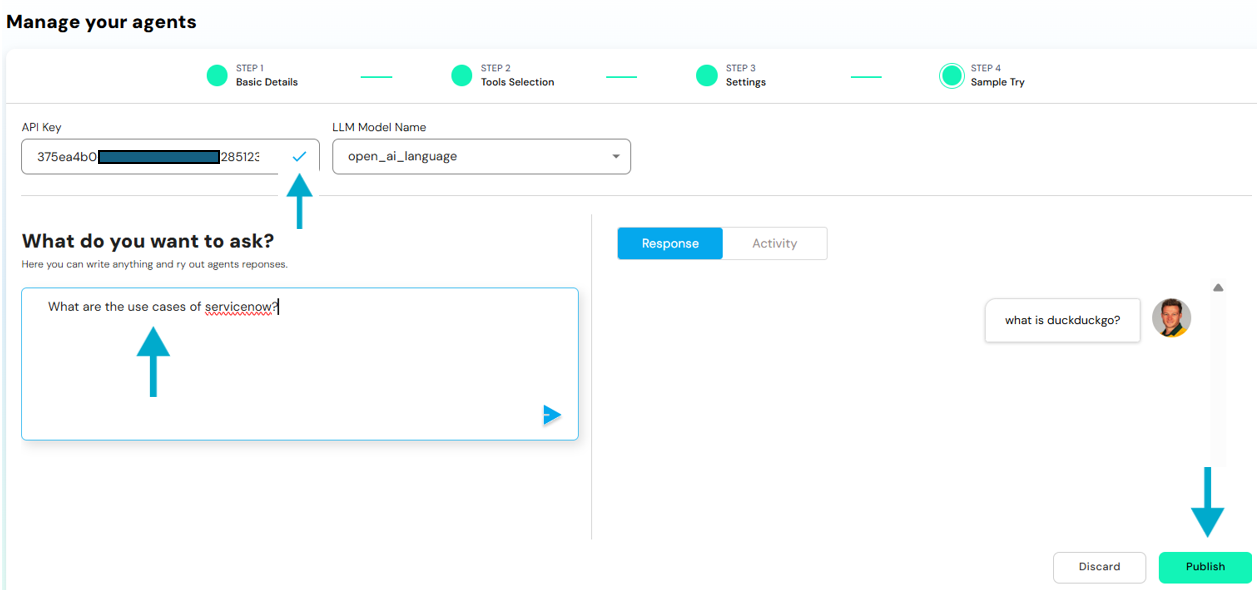 Once tested and confirmed, the agent can be published and is ready to be deployed across apps within the AXOMA platform.